
Build a GUI
py.space allows you to create graphical user interfaces (GUIs) that allow anyone to interact with your code. You can create a GUI in py.space with buttons, textboxes, tables, data grids, videos and much more.
In this tutorial, we’ll build a simple GUI that has a TextArea and a Button. When you type something into the TextArea and click the Button, you’ll get an email with whatever you typed into the TextArea.
Example:
We’re going to build a Captain’s Log widget, where you can log what’s happened each day. It will send each log entry to you by email, so your inbox contains a record of your adventures.
Here’s the finished widget:
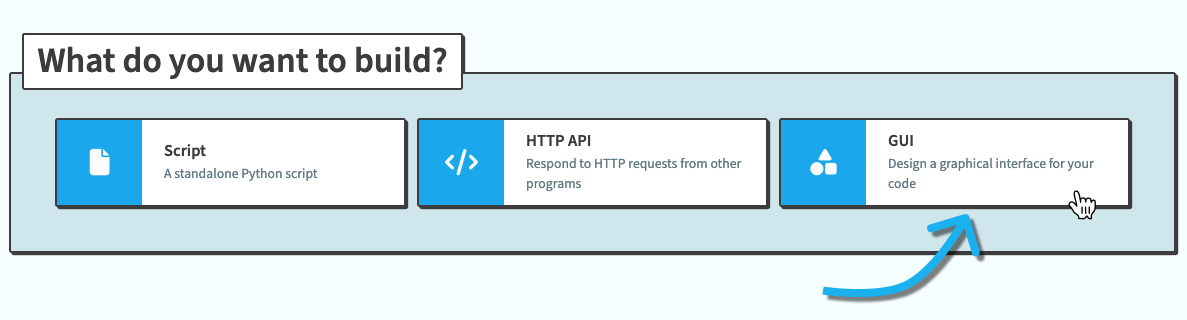
1. Create a GUI widget
Go to your account’s homepage, and under “What do you want to build?”, click GUI.
By default, the GUI will come with a little “Hello World” interface. We’ll modify this to build our Captain’s Log.
2. Design the page
If you’re not already looking at your widget’s UI, click on the Design tab to switch to that view.
First, click on the text that says “What’s your name?”. This is a
 Label. Double click on the text or click on the pencil icon and change the Label’s text to “What happened today?”.
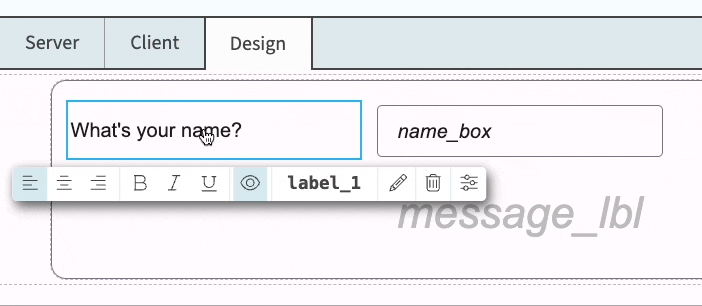
Click on the pencil icon (or double click on the text) to edit it.
Next, we can delete the name_box TextBox since we don’t need it. Drag a
 TextArea from the Toolbox on the right and add it below the Label. Click the name of your new TextArea (it will start off as
 text_area_1), and type a new name: log_box.
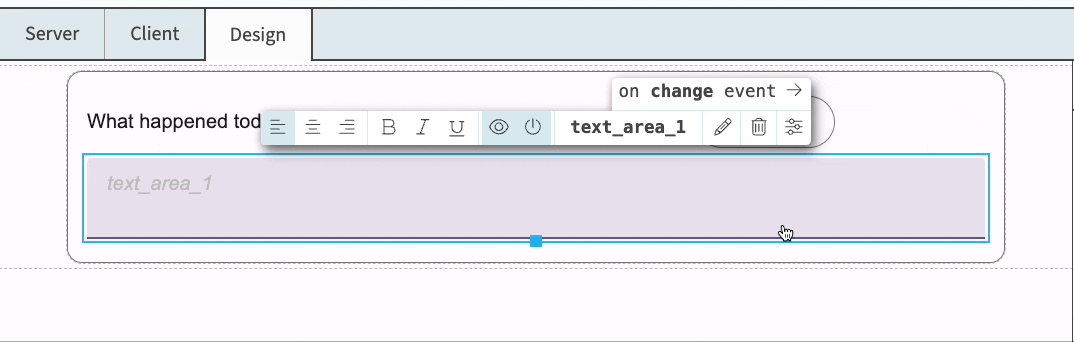
Click on the TextArea’s name to change it to log_box
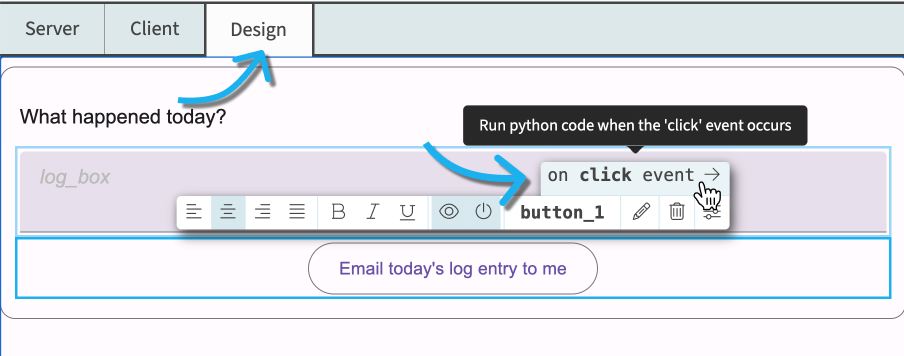
There is already a
 Button on the page. Click on it and change the text from “Say Hello” to “Email today’s log entry to me”. We also want the Button to be below the TextArea, so let’s drag it there.
With the Button selected, find “Appearance” in the Properties Panel and click “More Appearance Properties”. Change the role property to filled-button to give the Button a different look.
Finally, delete the message_lbl component since we won’t be using it.
There we go – you’ve built your interface!
3. Write server code to send an email
Now that we’ve built the user interface for our Captain’s Log, we can write a function that sends us an email with the input from the TextArea.
Select the Server tab and you’ll see a simple function already written that looks like this:
import anvil.server

@anvil.server.callable
def say_hello(name):
    return f"Hello, {name}!"
Our code already has import anvil.server at the top, but we need two other import statements for our new function to work:
from anvil import email
from datetime import datetime, date
Notice the @anvil.server.callable decorator above the function. This function will run on a secure back-end server, but we’re going to want to call the function when the Button on our GUI is clicked. @anvil.server.callable makes this function available from our front-end code.
Let’s change the name of the function to submit_log and the argument name to log_text. Then we’ll send an email with the log_text in the email body:
@anvil.server.callable
def submit_log(log_text):
    email.send(
      from_name="Mission Log",
      subject=f"Mission Log for {date.today()}",
      text=f"Today's log, submitted at {datetime.now().strftime('%c')}:\n\n{log_text}"
    )
4. Call the server code from the client
We now want to call the function we just wrote when the Button on our GUI is clicked.
Click on the Design tab to go back to the UI. Select the Button and click on on click event.
This will open the Client tab and highlight the function that will run when the Button is clicked. There will already be some code written inside that function. Replace it with the following:
    anvil.server.call("submit_log", self.log_box.text)
    alert("Mission log recorded!")
The code above is calling the submit_log server function we wrote in the previous step and passing in the text from the TextArea as an argument to that function. The alert() method will display a popup message.
The full code for your UI class should look like this:
class UI(UITemplate):
  def __init__(self, **properties):
    self.init_components(**properties)

  def button_1_click(self, **event_args):
    """This method is called when the button is clicked"""
    anvil.server.call("submit_log", self.log_box.text)
    alert("Mission log recorded!")
5. Run it!
Your Mission Log recorder is complete! Click Run at the bottom-right of your widget to try it out. Type something into the TextArea, click the Button then check your email!
6. Publish it on your profile
Click the switch at the top of your widget to make your widget public, so it appears on your profile.
What next?
There’s more to explore out in py.space! Why not check out another tutorial?
- Create a simple script that fetches weather data from an API
- Create an HTTP API that returns the current time
- Create a web scraper that runs as a scheduled task
Do you still have questions?
Our Community Forum is full of helpful information and friendly experts.